A Steady Self-Only-Owned VPN for Game online
This guide is to show you that how to set up a VPN running by yourself step by step for steady online gaming. Not an ad for buying a VPN service. The self managed VPN can help you with many online game network issues.
1. Why do I need a Private VPN for playing online game myself?
Many players frequently asked that:
- Do I need a VPN or not for playing online game or not?
- which VPN is the best for playing game online.
There is one rule:
If you’re facing connnection difficulty or latency issues, DONT hesitate to try a VPN for better game play experience.
The VPN can also help you:
- Download DLC content, and access Xbox Live and PSN exclusives from every country.
- Shorter connection routes between you and gaming servers.
- Play multiplayer games around the world with your friends even if a title requires an IP address from a specific country to play.
However, most of the players who have the aforementioned problems try to find a public VPN provider. Because data is not really safe depends on your VPN provider, your password or private files may leak to the public internet. Worst case, if the IPs provided have a bad record, the online game service will very likely ban you, this is An example happened recently.
Many players frequently asked that which VPN is the best for playing game online? My answer is :
There is no best VPN, but the most suitable VPN for you.
2. Virtual Private Server(VPS) Selection for Online Game
To find a good VPN provider is not easy, some players wasted lots of money on that. In this blog, I will give a tutorial on how to set up an online game VPN by yourself. The service provider (VPS) can be either Bandwagon, Amazon EC2 or Google Cloud Platform. These providers have good IP records, one of them is even one of the provider for EveOnline itself.
Among them, the Bandwagon is the cheapest, and GCP is the most expensive. So in this tutorial take Bandwagon as an example.

Chose the cheapest VPS in the list, it is enough for most of the online games. My VPN has 512MB RAM, 20GB SSD and 1TB Bandwidth. I rarely confront network problems using this setup and also host a webserver on it.
I am a player from China where has the most strict internet censor system know as GFW. Even VPS Bandwagon itself was banned from browsing. That is why I wrote this blog in English. Because individual VPN provider in China is illegal, do not want my webserver be blocked because of this blog.
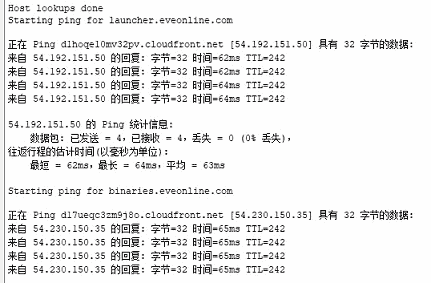
I am using a 200m bandwidth service from China Telecom. This is my recent ping from mid-China to EVEOnline server using launcher network diagnostics tool on work days. The internet is crowd at daytime, so the ping is not as good as in the evening.
1 | 正在 Ping dm794883twbxj.cloudfront.net [52.85.157.231] 具有 32 字节的数据: |
And after local time 18:00, the ping can be down to 60ms:
I also use this VPS for my 6 years old child playing Roblox which is a fantastic game platform for children. Before using the VPS, I can not play this hottest game in China due to connection issues or DNS pollution. And now, my child can enjoy this game without difficulty.
3. Step by Step to set up a VPN
3.1 Get an new OS on VPS
Almost every VPS has its own panel, but the Operation System (OS) is nearly the same which is Centos, Debian or Ubuntu. Bandwagon client area is like this:

Click the KiwiVM Control Panel. Install new OS->chose debian-9-86_64.

After the OS install completes, record the SSH password,port and also VPS IP address(in the main control panels). It will be used later.
1 | Install new OS |
If you forget the SSH password,you can simply click Root password modification-> generate and set new root password.It will show as
Root password modification
Root Password has been successfully set to:rEzrHd2Nf5b2
It is done with the VPS OS configuration.
3.2 VPS Configuration using Putty
Use the Root shell Command sometimes has limitation, it is recommend that using a SSH and telnet client such as PuTTY, Xshell. In this tutorial Putty is used.
Putty is an SSH and telnet client, developed originally by Simon Tatham for the Windows platform. Get the latest version here.
Open Putty client, fill in the Hostname and port of your VPS record in the 3.1 step.
Do not forget to chose the right connection type as “SSH”
Click open and you will get a warning press “Y” and continue.
1 | login as: root |
The copy the command one by one and also paste to the putty client.
- wget –no-check-certificate -O ./kcptun_for_ss_ssr-install.sh https://raw.githubusercontent.com/ackurdeeve/kcptun_for_ss_ssr/master/kcptun_for_ss_ssr-install.sh
- chmod 700 ./kcptun_for_ss_ssr-install.sh
- ./kcptun_for_ss_ssr-install.sh install
- wget is a download file command for linux. The first line is to get a script called kcptun_for_ss_ssr-install.sh.
- chmod 700 means the downloaded files must have a root executive permission. This command will return nothing, In linux if you excute a command and get nothing it means good.
- Install using the script.
After this, the Putty will show automated process, and finally get here. Choose 7 and hit Enter, press any key to install.
1 | +----------------------------------------------------------------+ |
Follow the install instructions. You will set
- input password for shadowsocksrr : 1234
- input port for shadowsocksrr : 1443
- select encryption : 6
chacha20 is good for mobile. - Protocol plugin : 1
use original is good for games latency performance - Obfs plugin : 1
use plain is good for games latency performance - input password for kcptun : 1234
can be same with the shadowsocksrr - input port for kcptun : 38989
- select method for kcptun : 2
aes-128 is good enough - fast mode : fast3
fast3 is for realtime online games, and will consume up to twice of normal tcp bandwidth. EVEOnline network is small, so can be neglect. - mtu : 1350
- select compression : 2
and then hit any key to continue. It will take a while from 2 to 5mins for the script to install and config. Finally we get there.
1 | IPv6 support |
Copy this down to a txt file or wherever convenient. To optimize the server you could run follows script, it enables Google BBR and is good for Network which has high package loss:
1 | wget --no-check-certificate https://github.com/teddysun/across/raw/master/bbr.sh && chmod +x bbr.sh && ./bbr.sh |
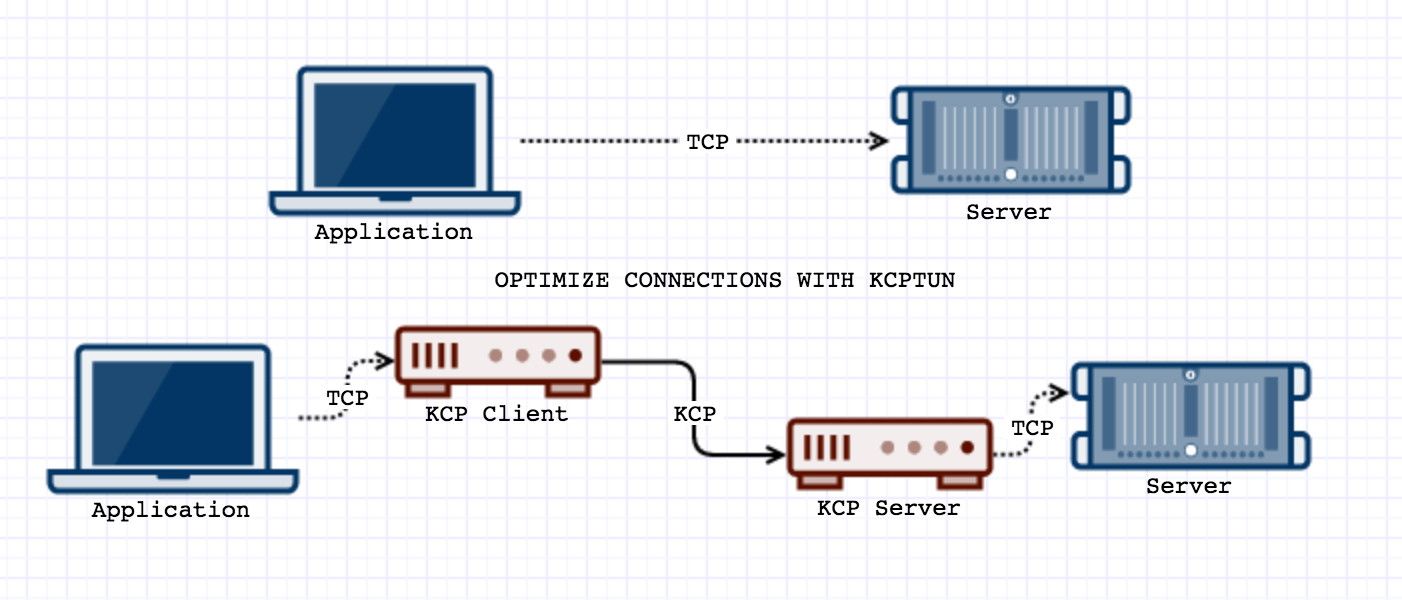
3.2 Software to get VPN server functional
There are three softwares needed to use the information copied in the 3.2 step.
- Shadowsocks
- kcptun
You also need a [Gui for Kcptun](https://github.com/GangZhuo/kcptun-gui-windows/releases) to config the protocol. - Proxifer
Download the latest version of them.
3.2.1 Shadowsocks
This part is easy. Config in the Shadowsocks like this:
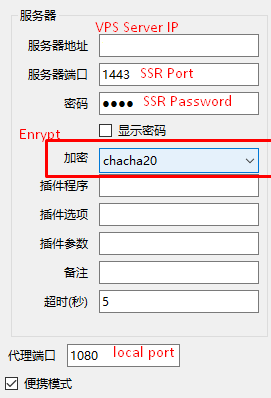
If you fill in the VPS server ip with 127.0.0.1, it will use Kcptun.
3.2.2 Kcptun
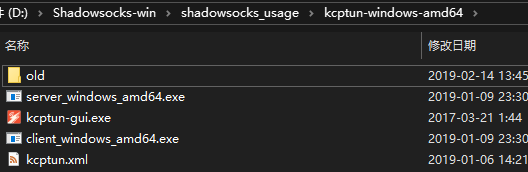
After you download the latest release of kcptun, if you are using Win10 64 as me, please download “kcptun-windows-amd64-20190109.tar.gz”.
Also get gui for Kcptun, and place it in the same folder with “client_windows_amd64.exe”.
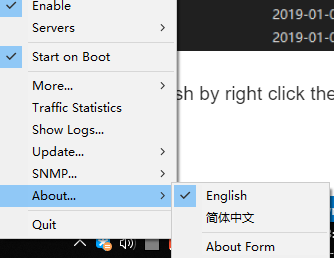
Open kcptun-gui.exe, you can set it to English by right click the icon in the buttom right of the system. Do not forget to enable the gui, otherwise it appears gray.
Config it like this. Remember to change your Shadowsocks server ip to 127.0.0.1,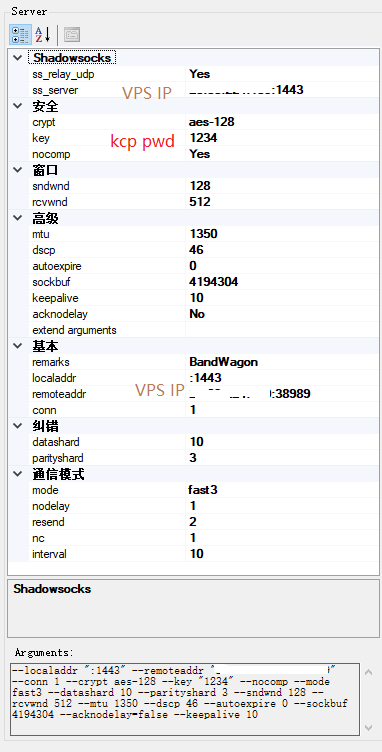
Do not forget that right click the icon (then “more->custom kcptun”) to locate file “client_windows_amd64.exe”.
3.2.3 Proxifier
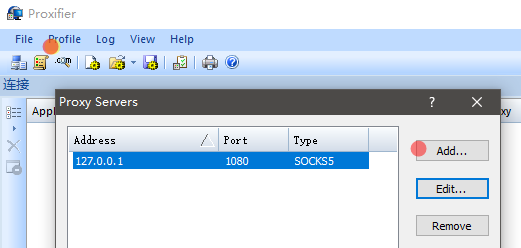
Get the Proxifer, and install it.
Click profile->proxy servers, add address with “127.0.0.1” , port “1080” ,protocol “socket 5”. The port is the same as SS local port.
Then press check to confirm that the server is correct set.
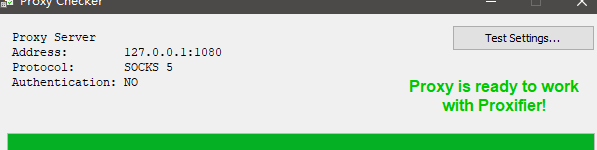
If everything goes well, it appears.
1 | [46:45] Starting: Test 1: Connection to the Proxy Server |
click profile->proxification rules, press ok and it is all done.
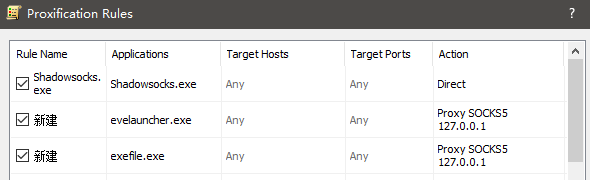
The setting is for EVEOnline. You can add other programs in the proxifier, and the program will go through the proxy to internet.
Enjoy
This is the end of the tutorial. Nothing hard, everyone can easily setup a VPN for himself following this guide.
Have a nice time and fly safe! Yours Ackurdeeve.